Showing posts with label Bread/Buns. Show all posts

Tuesday, August 22, 2006

Whole Wheat Bread with Raisins and Almonds


Just as the name implied. I was trying out a different way to make my whole wheat dough.


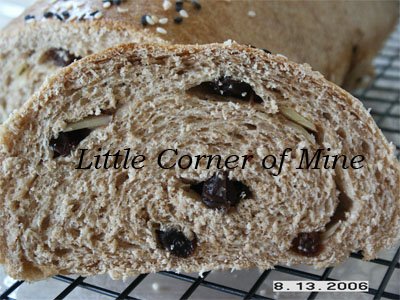
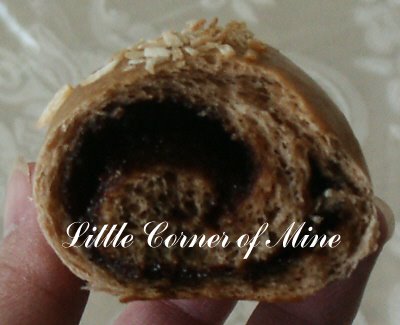
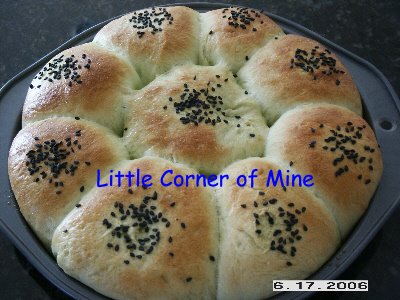
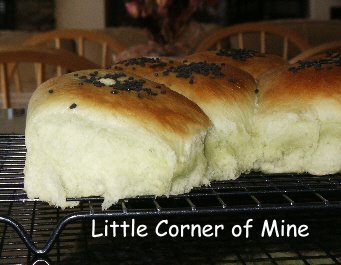
This is the closed up of the bread. I found bread making is really fun, all sort of ways to play with the dough. If you can imagine it, you can make it!

Friday, August 11, 2006

My Version of RotiBoy


This is my new creation. The healthier version of RotiBoy. LOL! This is made using my trusted basic sweet bun recipe, I just substituted the bread flour with whole wheat flour and white sugar with brown sugar.

Since I have some leftover Mexican topping from making the cream cheese bun that I kept frozen, I used that to make the topping, just added some cocoa powder and coffee emulco.

I used the same cream cheese filling (for the cream cheese bun) for this Rotiboy. If not, you can used salted butter as filling, just made sure the butter was still cold solid when wrap inside the dough to proof.

Then, I added some sliced almonds on top of the Mexican topping. As you can see, my sliced almonds slide down while baking...Oops!


Here's the close up of my whole wheat RotiBoy with cream cheese filling. What can I say, another soft and yummy bun for my snack and breakfast!

I store it in the refrigerator because of the cream cheese filling and toast it in a toasted oven for 4-5 mins the next day and tada....like fresh baked again!!

Friday, August 04, 2006

Cream Cheese Buns


I saw Yochana's cute little cream cheese buns and couldn't resist myself to ask her for the recipe. I made mine into a big buns because I don't have the cute flutted mould to use.


It's very delicious with the slightly sour cream cheese filling and crusty mexican topping. Definitely will make this buns again.


Oh, the topping will get soft and sticky the next day. But just pop it in the toasted oven and toast for 4-5 mins will bring back the crusty top and hot soft yummy buns.


Saturday, July 29, 2006

Tau Sar Buns (Red Bean Buns)

I bought a can of red bean paste the other day and thought of giving it a try. It's a fat free red bean paste from China, fat free because no oil was added, just water. Thus, I made red bean buns for breakfast.


This time I brushed the top with egg wash, that's why it has the golden shiny look.


Guess I'm still not very good at shaping filling inside the bun. But to my surprise, the fat free red bean paste actually tasted pretty good. Smooth and sweet, what's more, it's fat free!! So, feel a little guilt free while eating these buns. Now, I don't have to make my own red bean paste anymore. Hehe...can just buy it in Denver.

My daughter loves red bean too, she would stick her finger in to eat the red bean paste first before finish the rest of the bun. Quite messy if you ask me!

Friday, July 21, 2006

Nutella Buns


Experiment with Nutella as filling for my chocolate-coffee dough. The top was sprinkled with desiccated coconut.


What's the inside look like. Excuse the burr picture, hard to take close up.

Verdict: Not bad at all! Just like eating bun spreading with Nutella jam. Most important, my daughter who doesn't fancy bread/buns can finish the whole bread by herself, even two at one go. I asked her, "Hao zhi ma?" and she replied, "Hao zhi". Hehe...

Sunday, July 09, 2006

Chocolate Coffee Buns


I'm using the Basic Sweet Buns recipe posted here. The changes I made was adding 2 Tbp. cocoa powder, 1/2 tsp. coffee emulco and 10ml strong instant coffee liquid. I brushed the top with milk and sprinkled with white sesame seeds before baking.


Soft and satisfying buns with a hint of coffee and chocolate flavors, very nice with my morning cup of coffee.

Monday, July 03, 2006

Basic Pandan Buns

For Pei:


Basic Sweet Bun Dough recipe by Gina from Kitchencaper:

2 3/4 cup bread flour
1 cup plain flour
1 tsp. bread improver
1 tsp. salt
1 Tbp. milk powder
1 Tbp. instant yeast
1/2 cup sugar

1 egg
220ml cold water
1 tsp. pandan paste (I added)

1/3 cup butter
1 tsp. bread softener (optional)

Method (My way):

1. Add everything in according to your breadmaker manual. Turn on the dough function and let the breadmaker do the work.

2. When done, take the dough out, give it a few kneads and cut it and shape it whatever you like. For the above bun shape, roll the dough in cylinder shape, cut out individual portion, roll it into ball and place it on a square or circle baking pan lined with parchment paper.

Note: You can add any filling you like at this point as well.

3. When finished placing the balls of dough in the baking pan, leave some space in between for it to prove.  Cover with plastic wrap and let it proves for 45-60 mins depending on the temperature of your room (or double in size). It is faster if you let it proves under the sun.

4. When double in size, brush the top with milk or egg wash (sprinkle with sesame seeds if you like) and bake in the preheated 375'F oven for 10-12 mins. Or until golden brown on top. When warm from the oven, brush the top with some honey/maple syrup (like my picture above) to give it some shine.

5. Cool on wire rack and can be kept in the air-tight container and stay soft up to 4 days.

The variety of buns you can make from this is endless, try plain buns, green tea buns, chocolate buns, cinnamon buns, strawberry buns, mixed colors buns, etc.

Happy baking and experimenting!! :)

Sunday, June 25, 2006

Pandan Buns

After saying for months that I want to eat Pandan Buns with tau sar filling, I finally took out my breadmaker and made it. Finally got this craving satisfied! Hehe...

I used Gina's basic sweet bread recipe and added pandan paste into the breadmaker and turned on Dough function and let it did the work. Then, I divided the dough into half, one in the freezer it went, the other half, I cut into small balls, put the tau sar filling, closed and shaped like a ball shape. Put in a round baking pan, covered with wrap and let it proof under the sun for 40 mins. Remember to put a parchment paper on the baking pan first, if not the buns will stick.


When prove for 40 mins under the sun. I brushed the top with maple syrup and sprinkled with black sesame seeds. Oh, pardon my middle bun, got an indentation after I tried to pinch it after proofing because I spotted the dough was too thin.


Tada! Ready in 10 mins on preheated 375'F oven. Yeah, I have no even shaped buns because I was too lazy to measure the weight of each bun to shape it, also it's for our own consumption anyway, why bother with the extra work. :oP


Hhe buns are really soft (I added bread softener as well), but the green color is not obvious at all. Will have to add more pandan paste next time as I found the flavor not strong too.

Tuesday, February 21, 2006

Basic Bread

I finally bought a bread machine! Tried out one of the recipes provided in the booklet, got to test whether it's working or not. Thus, my first bread machine bread. :)


This is a basic 1.5 lb white bread. It's crusty on the sides and soft inside. I cut off the sides and ate it with olive oil with some spices and it was good. Funny though, why my top is like that huh? I saw others have nice rounded top. Can anyone shed some light into this? Thanks! Will see whether the sides remain crusty tomorrow or turn soft.


So, the crust turned soft the next day, just like normal bread. I added bread improver into the recipe so the bread remains soft.

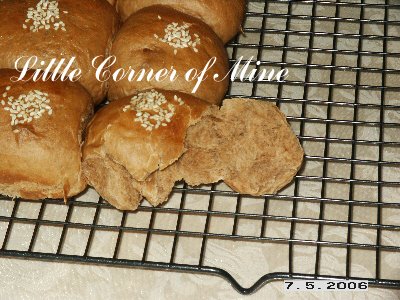
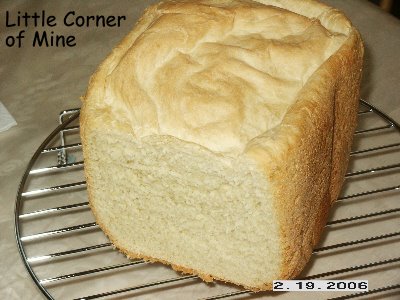
Need to get me some whole wheat flour and start making whole wheat bread, healthier.


Monday, November 14, 2005

Dried Crunchy Bread Strips

Seriously I didn't even know what this is called. But it's dried, it's hard & crunchy and it's made of bread cutting into strips. Therefore, this name is born.

My mom used to make this snack for me and my siblings when we were young and we always enjoyed eating this crispy sweet treat. Thus when I came over to the States, I just have to make it. I remembered my sister and I were trying to make this bread while in the college dorm but we failed miserably because the bread remain soft in the middle. At that time, I had no idea what went wrong and we never make it again (At that time, I was neither a cook nor a baker, merely a 20 year old college girl).

While I was watching Paula Deen on the Food Network this evening making her dressing for All-Stars Thanksgiving dinner, she mentioned she used days old bread to make her own dried bread for the dressing and baked the bread at low temperature to dry the bread. Ding...ding...ding...it's just clicked. I have some bread sitting in the fridge so why not experiment with it right? Ta...da...

Image hosted by Photobucket.com

The butter & sugar ones.

Image hosted by Photobucket.com

With Milo added.

Image hosted by Photobucket.com

When cooled, packed away in a plastic container.


Tuesday, November 01, 2005

Sweet Bread (Pai-Pau)


I used Jerseymom's recipe from KC. What prompted me to try this bread was the great reviews given by those who had tried it and posted their pictures. It looked really soft and easy to make.

I encountered minor problem in the beginning because I forgot to add an additional milk to replace the water used for her yeast. I was using instant yeast and it doesn't require that step. Thus, my dough was not wet enough so I just improvised by adding more melted butter and oil to make it pliable. *I only remembered about the liquid after I done kneading the dough* One more obstacle I encountered was it was a cold day and my dough just won't proof or double in size. I tried the warm water in the microwave trick, managed to proof a little, and that's about it. So, I just crossed my fingers and hoped for the best.


Was I glad that it turned out alright after all. Got to taste one when it was still warm from the oven and it sure soft to the bite. I brushed the top with maple syrup and it added to the sweet taste of the bread. A yummy sweet bread indeed and a recipe to keep. Thanks Jerseymom! :o)

The real challenge comes tomorrow since this is the first time I made bread without any bread improver, hope that it will still remain soft.

Verdict: It harden the next day but a quick pop in the Microwave solved the problem (10 seconds for one).

Wednesday, September 14, 2005

Chocolate Coffee Topping Mexican Bun


Made Mexican Bun with chocolate coffee topping the other day. I used coffee emulco & some instant coffee and found that I couldn't taste the coffee flavor. Perhaps the cocoa powder was over powering the flavor of coffee? Still need to experiment more with the topping. But here's the chocolate topping recipe.

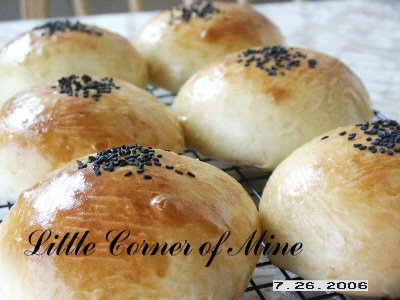
Chocolate Flavor Topping


1/3 cup sifted cake flour

1/4 cup sifted icing sugar

1/2 stick of soften butter (or 1/4 cup)

1 egg

2 Tbp. Hersey cocoa powder

Steps:

Combine all ingredients in a bowl. Whisk until all blended and put it into a piping bag and pipe spiral on top of each bun. Bake in 375'F for 8-10 mins.
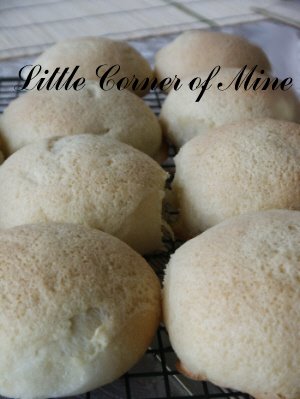
For the buns:

Use any basic sweet bun recipe. The filling will be salted butter straight from the fridge. Cut into cube to use as filling, about 1/2 Tbp. for each bun.

Tuesday, August 23, 2005

Black Sesame Seeds Bun


Made this when I was out of bread. Used the basic sweet bun dough recipe and sprinkle the top with black sesame seeds. Easy to make and my daughter loves it, just the bun not the sesame seeds though.

Sunday, August 21, 2005

A Way to Eat French Bread

My hubby took me to an Italian restaurant last week. This restaurant served a kind of bread, looked like french bread but only about 6 inches long. And the way they served it was to present you with a plate of some dried herds and then sprinkle some extra virgin olive oil on it. You ate it by tearing some of the bread and dipped into the olive oil mixture. Oh man, can I say good! I saw people dipping bread in plain extra virgin olive oil on TV, but never really though of eating a bread in that way, you know what I mean? But after this, after I got home I have to make my own since I have lots of dried herbs in my pantry anyway. So, I came out with this mixture (not sure whether it's the same, but it was pretty good).

Simple Dip for French/ Italian bread

A few sprinkles of dried basil
A little salt
A few sprinkles of extra virgin olive oil (EVOO)

1. Place the dried basil and salt on a plate and sprinkle the EVOO on top and serve with the bread.

So easy and yummy as well. And EVOO is good for your heart!! So, do try it and let me know whether you like it or not.

Friday, July 01, 2005

Green Tea Buns


I made Green Tea Buns the other day. Just use any basic sweet bun dough recipe and add 1 tsp. of green tea powder into the flours mixture. The green tea flavor is real subtle which is good for those who don't like the smell being too strong. I added mung bean paste as filling just because I have some leftover mung bean paste in the freezer. For stronger green tea flavor, add 2 tsp. green tea powder.

Thursday, June 16, 2005

Garlic Bread


I made garlic bread this morning. My garlic is too coarse, guess I will have to process it in my food processor next time if I want to make it again (or smash it really well). This bread was so soft when it's still warm from the oven, so good. I made my own garlic topping and not sure whether it's the right way or not. But this was what I did.

Garlic topping for 6 buns
==================
3 cloves of garlic, smashed it with some salt.
2 Tbp. of soften butter
1 tsp. of dried chopped chives

Mixed all together in a bowl. Spoon it in a small zipper bag, cut the tip off one end and squeeze it on top of the dough before baking.

Wednesday, June 15, 2005

Coconut Jam Bread


My second attempt at bread. Got the inspiration from the cookbook "Make Your Own Bread". Use the basic sweet dough, roll it into a long shape and tie a knot in the middle and fold the ends down. Brush the top with water and press it down in a bowl of crushed coconut and arrange 3 buns together to proof for an hour on a baking sheet. After an hour, put a spoonful of jam in the middle of each bun. It can be any flavour jam (strawberry, blueberry, peach, etc). Then bake in a preheated 375'F oven for 10 minutes.

I didn't do a good job on the jam as you can see. Not sure why my jam spread out instead of staying in the middle looking pretty. :oP

Saturday, June 11, 2005

My First Attempt at Making Buns


Finally decided to make sardine buns today using Gina's Basic Sweet Buns recipe. The variation I made: I added 1 tsp. of bread softener in addition to the bread improver. I don't have a stand mixer, so I did everything by hands. I rolled the dough until the butter was incorporated into the dough. And then I rubbed the outside of the dough with extra virgin olive oil before proofing for 5 hours (had to go out). Overall, I'm very satisfy with the result, the bun is soft like it should be. I just need to practise how to put the filling inside the bun and roll it into ball. Still not good at this and some of my filling was leaking out (greedy, wanted to stuff a lot of filling too). I only made 6 sardine buns, the rest I freeze it and will try it with chicken curry filling or plain green tea buns.

Venturing into making bread and buns is not too bad, will experience with more recipe later when I find time again. Thanks Lily for her instant yeast, without that I won't be able to make buns.